Automate Your Mechanical Fan

Last weekend I finally found some time to make my “mechinal fan” more smart. We have a “mechanical fan”, which makes sure fresh air is flowing trough the house, but also to dehumidify the bathroom. In our house we have a bathroom, without windows, so when taking a (hot) shower the humidity increases quickly. The mechanical fan makes sure the bathroom is dehumidified, which of course is important to make sure no bacteria or fungi get a chance.
This mechinacal fan has 3 speeds, slow, medium and high. Normally the fan is running at a slow speed which is low on energy, but also on noise. When we take a shower it would be best to turn the fan to high, so the bathroom is dehumidified quickly, but as you can imagine this is often forgotten, especially early in the morning.
Time to change this and to automate the mechanical fan speed. First of all we need to measure the humidity in the bathroom. Luckily I already had a z-wave temperature sensor for the floor heating, which also measures the humidity, a Heltun. As you can see the humidity is normally between 50% - 60%, which some peaks in the morning.

The next thing I needed was some kind of controller, which could turn the fan speed. To determine how to do this I first looked up the model of the mechanical fan an “Itho Daalderop CVE-S ECO” this particalar model is connected with a so-called “Perilex” connector.
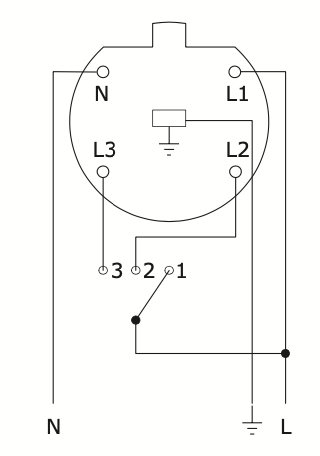
Also based on the documentation the meaning of the L1, L2, L3, which is important later.
| Color | Speed | Function | Connection | |
|---|---|---|---|---|
| N | Blue | Neutral | ||
| L1 | Brown | Low | Live | Power source |
| L2 | Grey (in my case Black) | Medium | Switch | Switch |
| L3 | Black | High | Switch | Switch |
This means to control the Fan I’ve to switch L2 and L3, if I can switch those two I can set all three speeds. Note that the L1 has a constant power-source and is therefore always on.
| Speed | L1 | L2 | L3 |
|---|---|---|---|
| Low | On | Off | Off |
| Medium | On | On | Off |
| High | On | Off | On |
This is also how the “manual” switch is working now, from the mechanical fan unit in the attic there run 3 cables down to the kitchen where the manual switch resides. These three cables are brown (Live) and Black (L2), Black (L3). I switch between L2 and L3, if the switch is neutral postion, both (L2, L3) are off.
I choose the Qubino Flush 2 Relays (QUB_ZMNHBD1) for the job to switch L2 and L3 individually. The Qubino comes with seperate inputs (I1,I2) for both outputs (Q1,Q2), this makes it possible to keep the manual switch in case an override is necessary. The downside of the manual control I use is that it is not a “flip”-switch, so I’ve to resend it manually with the state of the controller. In our case no big deal, because we normally don’t use the switch and if we want we can control it from Home-Assistant directly.
So the complete schema looks like this, on the left the Perilex schema and the Qubino and manual Switch below.
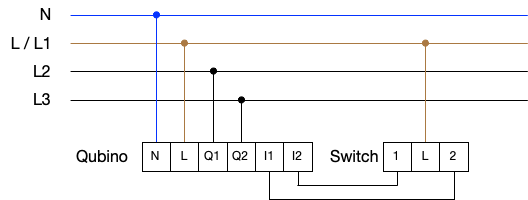
It is important to note that “L1” is live and is a constant power source, making sure the Qubino and the manual switch work. After installation I added everything to home-assistant and used nodered to automate it all.
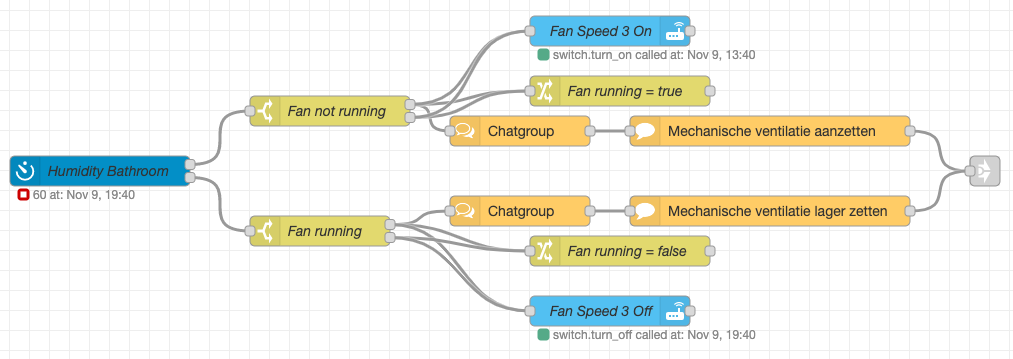
The chatgroup is there, for debugging purposes and I used it before I had the Qubino to get notified and to test the flow. As you can see I only switch L3, so when the humidity is higher than 60% I switch the mechanical fan speed to high and when it is below 60% it turns L3 off and turns back to low speed. I also set a variable, to prevent constant messaging.